Search SharePoint from a Power App using Power Automate
In this example, we have a canvas Power App that needs to search a SharePoint Document Library for specific documents and display the results within the app.
Since Power Apps can't search SharePoint directly, we can use a Power Automate workflow that we can add to our app. The workflow executes a SharePoint search, returns the results to the Power App as text JSON that we can parse and display in a collection.
Create a Power Automate Workflow
- Add a new Instant Power Automate workflow to your solution.
- Add the Power Apps (V2) Trigger.
- Add a text parameter named QueryText. This will be the search query the user types in the Power App and will be used for our search.

- Add a Send an HTTP request to SharePoint action.
- Set your Site Address to an Environment variable pointing to your SharePoint site.
- Set the Method to
Get. - Set the Uri to your search query. This example assumes we're searching a specific document library for specific types of documents.
- The queryText should be set to
@{triggerBody()['text'], which maps to the QueryText field added in the trigger. The * before and after are so that search handles this as a "contains" and not an exact match. - The Path is only necessary if you're trying to search a specific site or library. You can create a Text Environment Variable to set this Path in your solution and pass it into the Uri, making it portable across environments.
- The
(FileExtension:pdf OR FileExtension:docx OR FileExtension:xlsx)is limiting our search to specific file types. You can exclude this if you want. - trimduplicates can be set to true or false.
- selectproperties is set to the fields we want to return.
- rowlimit is set to the number of results we want to return.
- The queryText should be set to
_api/search/query?querytext='*@{triggerBody()['text']}* AND Path:"{path too your SharePoint library}" AND (FileExtension:pdf OR FileExtension:docx OR FileExtension:xlsx)'&trimduplicates=false&selectproperties='FileName, ID, Title, Path, FileExtension, Author'&rowlimit=100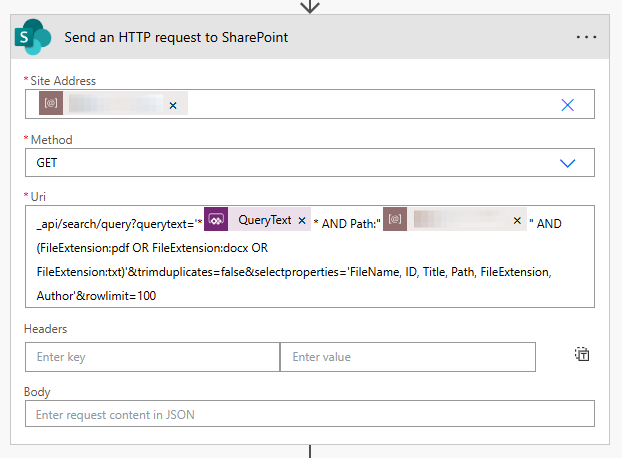
- Next, add the Parse JSON action.
- Set the Content to the body of the Send an HTTP request to SharePoint action.
- To get the Schema, you'll want to save your flow and run it with a test query. Then copy the output from the Send and HTTP request to SharePoint action. Next, click the Generate from Sample button in the Parse JSON action and paste the output, which will generate the Schema seen in the screenshot.
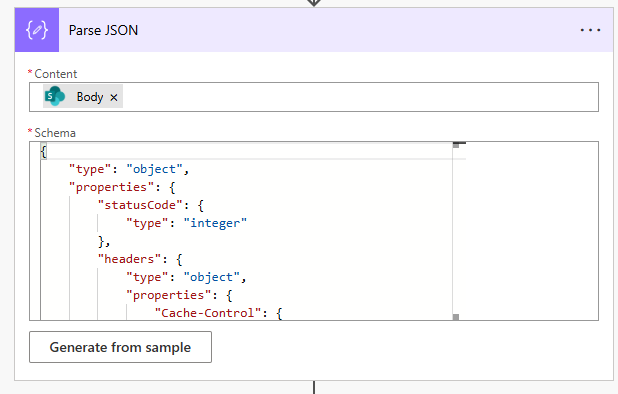
If you look at the Schema for the Parse JSON, you can see it is complex. We need to fetch the values from our columns (Filename, Path, ID, Title).
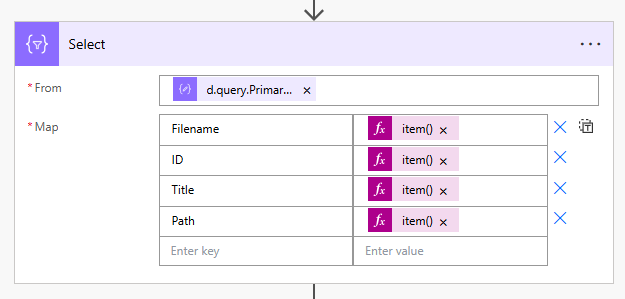
To make this easier, we'll use the Select action to simplify our results by returning only the four necessary fields and eliminating the rest.
- Add a Select action to your workflow.
- Set the From parameter to the following:
@{body('Parse_JSON')?['d']?['query']?['PrimaryQueryResult']?['RelevantResults']?['Table']?['Rows']?['results']}- In the Map section, we'll add each of our fields. Each is mapped to the Value of the column from our results. If you have different fields than what we configured above, you'll need to look at these closely to select the correct field values.
- Filename:
item()?['Cells']?['results']?[0]?['Value'] - ID:
item()?['Cells']?['results']?[1]?['Value'] - Title:
item()?['Cells']?['results']?[2]?['Value'] - Path:
item()?['Cells']?['results']?[3]?['Value']
- Filename:
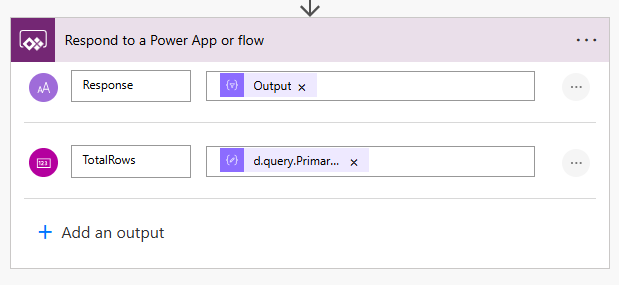
- Finally, add a Respond to a Power App or flow action.
- Add a text parameter named Response set to the Output of our Select action above.
- Add a number parameter named TotalRows set to the expression
body('Parse_JSON')['d']['query']['PrimaryQueryResult']['RelevantResults']['TotalRows']. This will return the total number of items returned, which we can use in our app.
Update our Power App
- Add the Power Automate workflow you created above to your app.
- Add a text input to your screen.
- Add a search button to your screen.
- Update the OnSelect property of your Search button.
UpdateContext({tmpSearchResults: {YourWorkflowName}.Run(txtSearchText.Value)});
ClearCollect(
    colSearchResults,
    ForAll(
        ParseJSON(tmpSearchResults.response),
        {
            Filename: Text(ThisRecord.Filename),
            Path: Text(ThisRecord.Path),
            ID: Value(ThisRecord.ID),
            Title: Text(ThisRecord.Title)
        }
    )
)- The first line executes our workflow, passing in the value from our search textbox. The results are saved to a context variable named tmpSearchResults.
- The following few lines create a collection by using the ParseJSON on our tmpSearchResults.response and converting it into a record where we convert the Untyped column values into Typed values (ID is a number, and the other three are Text).
Testing
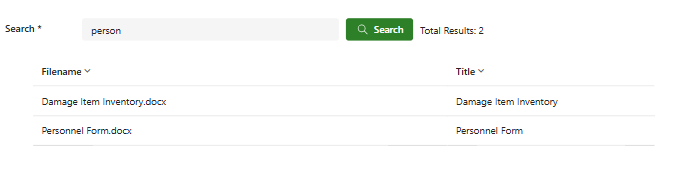
- Open your app, enter search text in the search box, and click Search. If you have matching documents, you should see some results.
- In my example, my collection, colSearchResults, contains both of my search results and all four columns.

We can use this collection in a Gallery or a table to display the fields and see our results!
What else?
There are a few things I would recommend doing to polish this up a bit before publishing for users in production.
- Add a spinner control that shows when the user clicks Search and hides when the results are returned. Since the search takes a couple of seconds, it can seem like nothing is happening (unless you see the tiny progress indicator going across the top of the screen).
- Set the DisplayMode of your Search button to Disabled when the Search text box is empty.
- Update your Gallery or Table to display a message if no results are returned.
- Clear your collection, variable, and search textbox in the Screen.OnVisible property, so every time you load the screen, you're starting over.
Clear(colSearchResults);
Reset(txtCDSearchText);
UpdateContext({tmpSearchResults: Blank()})
Member discussion